
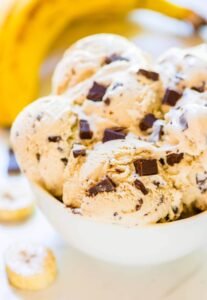
Banana Ice Cream Recipe
Banana ice cream combines the natural sweetness and creaminess of ripe bananas with the cool, smooth texture of traditional ice cream. Using bananas as the base means you can skip eggs and rely on their natural sugars and rich flavor. This recipe walks you through every step—from selecting the best bananas to serving suggestions that make this homemade treat shine.
Ingredients (Serves 4–6)
- 4 large, overripe bananas (brown-speckled peel)
- ½ cup whole milk or plant-based milk (almond, oat, or soy)
- ½ cup heavy cream (omit or replace with additional milk for a dairy-free version)
- 2 tablespoons granulated sugar (optional, adjust to taste)
- 1 teaspoon pure vanilla extract
- Pinch of fine sea salt
- Optional mix-ins:
- ¼ cup chopped dark chocolate or chocolate chips
- 2 tablespoons creamy peanut butter
- 2 tablespoons shredded coconut
- 2 tablespoons chopped nuts (walnuts, pecans, almonds)
Equipment Needed
- Sharp knife and cutting board
- Parchment paper or silicone baking mat
- Baking sheet or tray (for freezing banana slices)
- High-speed blender or food processor
- Spatula or spoon for scraping
- Freezer-safe, airtight container
1. Select and Prepare Your Bananas
Choosing very ripe bananas is essential. Look for fruit with heavy browning or black spots on the peel. These bananas are sweeter and blend into a creamier base.
- Peel and Slice: Remove the peels, then cut each banana into ¼-inch thick rounds.
- Flash-Freezing: Lay the banana slices in a single layer on a parchment-lined baking sheet so they freeze separately. Place in the freezer for at least 2 hours, until solid.
2. Blend Frozen Bananas into a Creamy Base
Frozen banana slices transform into a soft-serve texture when blended. Follow these steps for the smoothest result:
- Slightly Soften: Remove the baking sheet and let banana slices sit at room temperature for 5 minutes—enough to loosen their edges.
- Begin Blending: Transfer the banana slices to a high-speed blender or food processor. If your appliance struggles, start with half the slices, blend until broken down, then add the rest.
- Add Liquid: Pour in ½ cup of milk and ½ cup of heavy cream (or a total of 1 cup milk for a lighter/dairy-free version).
- Sweeten and Flavor: Add 2 tablespoons sugar (or to taste), 1 teaspoon vanilla extract, and a pinch of salt. The salt enhances the banana’s sweetness.
- Pulse and Scrape: Pulse several times to break up large chunks. Scrape down the sides so everything hits the blades.
- Blend Until Smooth: Continue blending on high until the mixture is silky and uniform—about 1–2 minutes. Scrape as needed to achieve a consistent texture.
3. Customize with Flavor Variations
Tailor your banana ice cream by incorporating one or more of these add-ins:
- Chocolate Swirl: Divide the blended base in half. In one portion, stir in 2 tablespoons melted dark chocolate or chocolate chips. Layer the plain and chocolate portions in your container for a marbled effect.
- Peanut Butter Blend: Stir 2 tablespoons creamy peanut butter into the base until fully incorporated. The nuttiness pairs beautifully with banana.
- Coconut Crunch: Fold 2 tablespoons shredded coconut into the mixture. Before firming up in the freezer, sprinkle extra coconut on top.
- Nutty Mix: Once blended, fold in 2 tablespoons chopped nuts of your choice. The chopped nuts add texture and a toasty note.
Feel free to combine elements—peanut butter and chocolate, for example—to create a signature flavor.
4. Freeze Until Firm
To achieve scoopable firmness, you’ll need to give the mixture time to set fully:
- Transfer to Container: Spoon the blended banana mixture (plus any mix-ins) into an airtight, freezer-safe container. Use a spatula to smooth the surface.
- Press Plastic Wrap (Optional): Lay a piece of plastic wrap directly on the surface to minimize ice crystals.
- Freeze: Place the container in the freezer for at least 3–4 hours. For best results, freeze overnight.

5. Serving Suggestions
When the ice cream is ready, remove it from the freezer and let it rest at room temperature for 5–10 minutes. This brief thaw softens it enough for clean scoops without melting.
- Scooping Tip: Run an ice cream scoop under hot water and dry it. Warm metal makes neat, round scoops.
- Toppings and Garnishes:
- Fresh banana slices and a drizzle of honey or maple syrup.
- Chopped nuts (walnuts, pecans) for crunch.
- Chocolate shavings or a dusting of cocoa powder.
- A dollop of whipped cream for extra indulgence.
- Fresh mint leaves for a pop of color and a hint of freshness.
6. Storage and Shelf Life
Store your banana ice cream in the back of the freezer, where the temperature is most consistent. Use an airtight container to prevent freezer burn. For optimal texture and flavor, enjoy within two weeks. After that, ice crystals may develop, affecting creaminess.
7. Tips for Perfect Results
- Banana Ripeness: Overripe bananas yield the sweetest, creamiest base. If yours aren’t fully brown yet, place them in a paper bag with an apple or ripe tomato for 24 hours to speed ripening.
- Blender Power: A high-speed blender or food processor works best. If yours struggles, let the bananas sit out an extra few minutes and add a splash more milk to ease blending.
- Adjust Sweetness: Taste the blended mixture before freezing. Ripe bananas can be very sweet, so you might need less sugar (or none at all). Conversely, if they’re only moderately ripe, add an extra tablespoon or two of sugar.
- Dairy Options: For a richer texture, use whole milk and heavy cream. To lighten it up, swap cream for more milk or use coconut milk for a tropical twist.
Final Thoughts
Homemade banana ice cream delivers a naturally sweet, creamy dessert that’s simple to make and endlessly customizable. By relying on bananas as the star ingredient, you eliminate the need for eggs and heavy sweeteners. Whether you enjoy it plain, swirled with chocolate, or studded with nuts, this treat is sure to become a favorite. Gather ripe bananas, prep your blender, and within hours you’ll have a bowl of delicious, homemade banana ice cream to savor.