
Donuts Dough Recipe
Homemade Donut Dough
Introduction
Creating classic yeast-raised donuts from scratch delivers a soft, airy interior wrapped in a lightly crisp exterior. When prepared properly, these homemade treats rival anything from a bakery, offering a tender crumb that melts in your mouth. By mastering the art of a simple dough recipe, you unlock endless possibilities: from glazed rings to sugar-coated rounds, or even filled delights bursting with jam or custard. Whether enjoyed for breakfast, afternoon snacks, or dessert, freshly fried donuts carry a nostalgic appeal and a comforting sweetness that store-bought versions often lack. This complete guide provides everything you need to mix, proof, shape, fry, and finish your own irresistible donuts at home.
Ingredients
- All-Purpose Flour: 4 cups (approximately 500 grams), plus extra for dusting the work surface.
- Active Dry Yeast: 2¼ teaspoons (one standard 7-gram packet).
- Whole Milk: ¾ cup (about 180 milliliters), warmed to 100–110°F (38–43°C).
- Water: ¼ cup (about 60 milliliters), warmed to 100–110°F (38–43°C).
- Granulated Sugar: ¼ cup (50 grams), divided—1 teaspoon for activating yeast, remainder for the dough.
- Unsalted Butter: 4 tablespoons (56 grams), melted and cooled slightly.
- Large Eggs: 2, at room temperature.
- Salt: 1 teaspoon (about 5 grams).
- Vegetable Oil: For frying, about 2 cups (470 milliliters), depending on pot size and desired oil depth.
- Glaze or Coating Options (select one or more):
- Classic Vanilla Glaze: 2 cups powdered sugar + 3–4 tablespoons milk + 1 teaspoon pure vanilla extract.
- Cinnamon-Sugar Coating: ½ cup granulated sugar + 1 tablespoon ground cinnamon, mixed in a shallow bowl.
Equipment & Preparation
- Mixing Vessel: Stand mixer with dough hook attachment, or a large mixing bowl and sturdy wooden spoon if mixing by hand.
- Thermometer: Instant-read or candy thermometer to monitor oil temperature.
- Frying Vessel: Heavy-bottomed pot or dedicated deep fryer, sized to hold 2–3 inches (5–7 centimeters) of oil.
- Rolling Pin: For rolling out dough to an even thickness.
- Donut Cutters: A set of two round cutters—one approximately 3 inches (7.5 centimeters) for the outer circle, and one 1 inch (2.5 centimeters) for the center hole. If you don’t have cutters, use any similarly sized biscuit cutters or improvise with a glass and bottle cap.
- Baking Sheet & Parchment: To rest the cut donuts while they proof before frying.
- Wire Rack: Placed over a baking sheet to drain excess oil post-frying.
- Pastry Brush: For applying glaze, melted butter, or egg wash if needed.
Step-by-Step Instructions
- Activate the Yeast
- In a small bowl or liquid measuring cup, stir together the warm water (¼ cup) and 1 teaspoon of the granulated sugar. Sprinkle the active dry yeast on top and give it one gentle swirl. Allow this mixture to sit undisturbed for about 5–7 minutes. The yeast should bloom into a foamy, bubbly layer. If there’s no foam, the yeast may be expired—discard and start again to ensure the dough will rise properly.
- Combine Wet Ingredients
- In the bowl of a stand mixer (or a large mixing bowl), whisk together the warmed milk (¾ cup), melted butter (4 tablespoons), remaining sugar (a scant ¼ cup minus the teaspoon used earlier), and the two room-temperature eggs. Add the salt and stir until most of the sugar has dissolved into the milk.
- Incorporate the Yeast Mixture
- Pour the frothy yeast mixture into the milk-and-butter bowl. Stir gently by hand or set the mixer to low speed, just until the liquids are evenly combined.
- Add Flour & Form the Dough
- With the mixer running on low (using the dough hook), gradually add 3 cups (375 grams) of the flour. Once a shaggy dough begins to form, add the remaining cup (125 grams) bit by bit. If mixing by hand, use a wooden spoon to bring the dough together, scraping down the sides of the bowl as you go. Continue until the dough roughly comes together in a cohesive ball that pulls away from the sides of the bowl.
- Knead to Develop Gluten
- Knead the dough on medium speed with your stand mixer’s dough hook for 6–8 minutes, or turn it onto a lightly floured surface and knead by hand for 8–10 minutes. The goal is a smooth, elastic texture that feels slightly tacky but does not cling to your fingers. If the dough sticks, sprinkle on a pinch of flour at a time until manageable. Avoid adding too much flour, as an overly dry dough produces dense donuts rather than tender, airy ones.
- First Rise (Bulk Fermentation)
- Shape the dough into a smooth ball and place it in a lightly oiled bowl, turning it once so the entire surface is coated in a thin film of oil. Cover the bowl tightly with plastic wrap or a damp cloth and let the dough rise in a warm, draft-free spot until it doubles in size—about 1 to 1¼ hours. Ideal rising temperature is between 75–80°F (24–27°C).
- Shape & Proof the Donuts
- Once doubled, gently punch down the dough and turn it onto a lightly floured work surface. Roll it out to about ½ inch (1.3 centimeters) thickness using a rolling pin. Use the larger round cutter (approximately 3 inches in diameter) to cut out dough circles. Then press the smaller cutter (1 inch in diameter) into the center of each circle to create the characteristic donut hole. Place each cut ring and hole onto a baking sheet lined with parchment paper, spacing them about 1 inch apart. Gather scraps, re-roll once to maximize yield, but avoid overworking. Cover the shaped donuts loosely with plastic wrap and let them proof for 30–40 minutes, until puffy but not completely doubled—they will expand further during frying.
- Heat the Oil for Frying
- While the donuts are proofing, pour vegetable oil into a heavy-bottomed pot to a depth of about 2–3 inches (5–7 centimeters). Heat the oil gradually over medium heat until it reaches 350°F (175°C). Use an instant-read or candy thermometer to monitor temperature. Maintaining an even 350°F throughout frying is key: if oil is too cool, donuts absorb excess oil and become greasy; if too hot, exteriors burn before interiors cook.
- Fry the Donuts
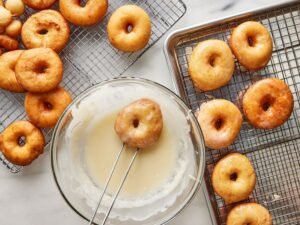
- Carefully remove a few donuts from the parchment—do not overcrowd the pot; usually two to three fit comfortably depending on pan size. Gently lower each donut into the hot oil using a slotted spatula or spider skimmer. Fry for about 45–60 seconds on one side, or until a golden brown forms, then flip and fry for an additional 45–60 seconds. The goal is an even, deep golden hue all around. Once golden, transfer the donuts to a wire rack placed over a baking sheet to drain for about a minute. Repeat the process with remaining donuts, being mindful of temperature fluctuations.
- Fry the donut holes using the same method—reduce frying time slightly, as holes cook faster due to smaller size.
- Glaze or Coat
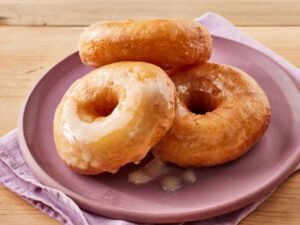
- Vanilla Glaze: Whisk together 2 cups powdered sugar, 3–4 tablespoons milk, and 1 teaspoon vanilla extract in a medium bowl until smooth and pourable. While donuts are still warm (but not hot enough to dissolve glaze immediately), dip the top half of each donut into the glaze. Place back on the rack to let excess drip off and allow the glaze to set for 5–10 minutes.
- Cinnamon-Sugar Coat: Mix ½ cup granulated sugar with 1 tablespoon ground cinnamon in a shallow bowl. While donuts are warm, gently roll them in the mixture, coating evenly on all sides.
- Optional Filled Variation
- If you prefer jelly, custard, or cream-filled donuts, skip the hole-cutting step. Instead, cut larger circles (about 3½–4 inches). Fry as above. Once slightly cooled (about 5 minutes), fill a piping bag fitted with a small round tip or a disposable bag with jam or pastry cream. Insert the tip into the side of each donut about ½ inch, squeeze gently until you see the filling appear. Dust with powdered sugar or glaze to conceal the filling seam.
- Cooling & Serving
- Allow glazed or coated donuts to rest on the rack for another 5–10 minutes so toppings can fully set. Serve donuts warm for the best texture; however, they remain delicious at room temperature for several hours. Fresh donuts will always taste best on the day they’re made, though you can warm them gently in a 300°F (150°C) oven for 3–4 minutes if needed.
Tips & Variations
- Flavor Additions: Stir ½ teaspoon ground nutmeg, cardamom, or finely grated citrus zest (lemon or orange) into the dough for subtle aromatic notes.
- Chocolate Glaze: Replace half of the milk in the vanilla glaze with ½ cup melted semi-sweet chocolate. Stir until velvety smooth, then dip donuts.
- Baked “Donuts”: For a simpler method, bake instead of fry: shape dough into rings, place on a greased donut pan, and bake at 375°F (190°C) for 8–10 minutes. Brush with melted butter, then coat in sugar. Note that texture differs—it will be more like a cake donut than a yeast donut.
Storage & Make-Ahead
- Dough Prep Ahead: After the first rise, punch down and refrigerate dough (covered) for up to 24 hours. Allow to come to room temperature (about 1 hour) before rolling, cutting, and proofing. Cold fermentation enhances flavor.
- Storage of Cooked Donuts: Place completely cooled donuts in an airtight container at room temperature. Uncoated donuts last up to two days; glazed or sugar-coated varieties best enjoyed within one day. For a fresh taste, microwave a coated donut for 10–15 seconds or reheat in a low oven (300°F / 150°C) for 3–4 minutes.
Yield & Timing
- Yield: Approximately 12 standard-size ring donuts plus donut holes from the cutouts.
- Active Prep Time: About 30 minutes for mixing, kneading, cutting, and glazing.
- Total Time: Roughly 2 hours, including resting, proofing, and frying, depending on room temperature and individual bench time.
Enjoy these homemade donuts while they’re warm, relishing their tender crumb and sweet finish. Whether classic glazed rings, cinnamon-sugar-coated treats, or filled delights, your efforts yield a delightful batch that friends and family will savor.